
smart WINERY
"Your private brewing solution"
Creators: Lin, Helena, Adam, Mads, Andreas & Sofie.
The project was created equally by all of the members
The concept
When considering the aim of implementing sustainability into our project, we discussed many different aspects like; garbage sorting, home farming, energy consumption and food waste. We went with our idea about a so-called smartWINERY, with the hopes that this product could help combat food waste by giving life to fruits which would otherwise have been discarded. Our main focus is fruit waste caused by browning/overproduction, since we found that:
“It's estimated that probably half of apples actually end up in waste as a result of the browning.”

.png)
Prototyping
When developing the smartWINERY, prototyping on both the subsystems and the integrated systems have been performed. Most of our prototypes have been proof of concepts on both our mechanisms, electronic constructions and design in general, and have often helped us to choose in which direction to further develop.
To get from our alpha prototype to our beta prototype, the three week period has been divided into three sprints, each with its own focus area and goals.

The usecase
The smartWINERY works by allowing the user to brew fruit wine made from fallen or browned fruits, in a fun and effortless manner. When the user has produced the juice and added it to the carboy together with sugar and yeast, the smartWINERY takes care of the rest of the fermentation process. The user is now capable of tracking the wine’s bubble production (production of carbon dioxide and ethanol), temperature and alcohol percentage through an app. The app will notify the user, if any actions need to be made, like moving the smartWINERY to a cooler place if overheated or when the brewing is done and the wine needs to be bottled. This way the user can easily leave the smatrWINERY for several days without having to worry about the progress.
Comparison
One of the smartWINERY’s perks is how it allows for the user to leave the product while brewing. When manually brewing wine at home, the user would need to stir/shake the carboy every day to keep the fermentation going, rack the wine into another carboy by the use of a siphon pump twice, and monitor it daily to make sure the fermentation is finished at the right point. This means that not only does the brewing become way easier when using the smartWINERY, it also ensures that you get a more controlled process, and as a result of this - a better outcome in terms of a better tasting wine.
Prototyping planners
A strategic manner to document the fabrication of our prototypes, has been by creating prototyping planners. These have functioned as platforms to get an overview of the different strategies used, the purpose of each prototype, and as help to quantify an otherwise qualitative process.
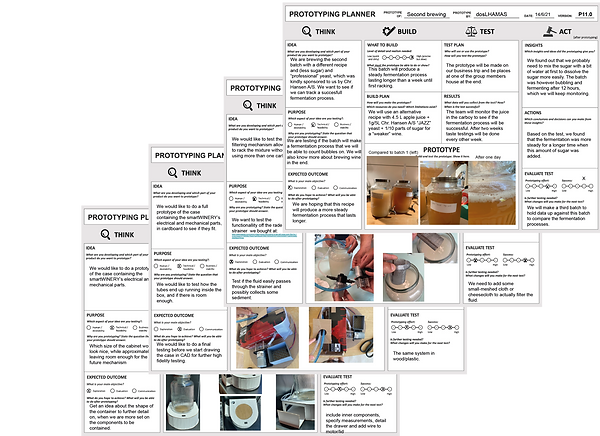
ProtoMap + lab book
A process running in parallel with the production of prototyping planners was to develop a visualization of our progress though the ProtoMap. The structured overview helped us to track our design decisions, and to get a common understanding on which iterations each team member had executed. Since we have worked on a system with multiple subsystems, each with a variety of iterations, we used the tool “lab book” to document smaller iterations not comprehensive enough to take up a full prototyping planner.


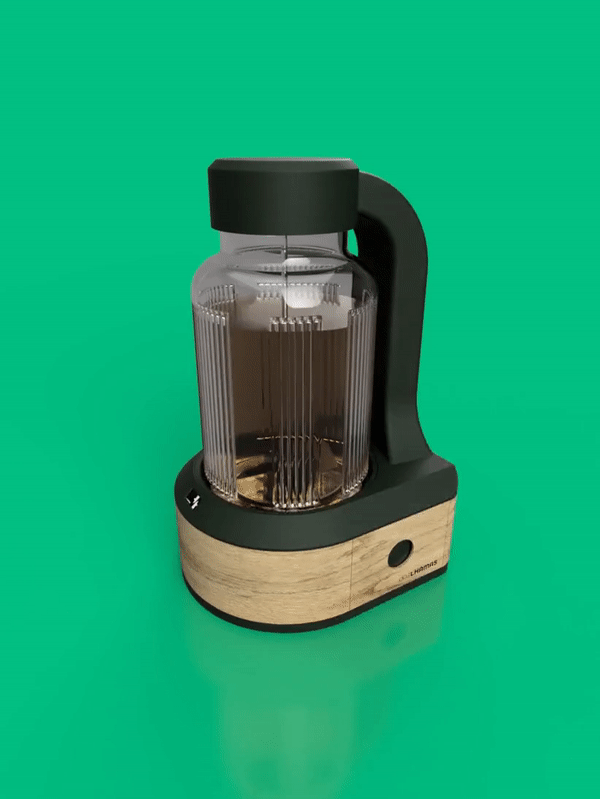
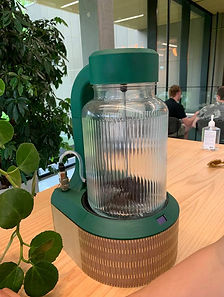
Final design
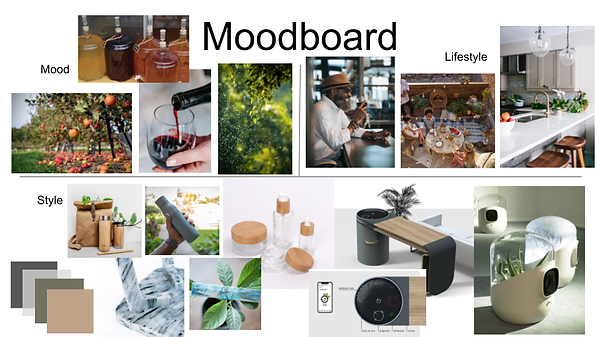
Our final design is based on the wish to indicate the sustainable aspect of the product, and is structured around the following moodboard. This has eg. caused the visual design in wood and dark green, but also the form language, which is smooth and dynamic.

The case
The structure is made of 3D printed plastic parts and laser cut wooden plates. The base contains the electronics, OLED screen, pump and filter, as well as enough tubes and wires to make a lasso for catching wild lhamas. We chose to design the base as a square with a rounded front, since the flat back allows for the smartWINERY to be placed against walls or cabinets without creating wasted space.
The case’s spine contains the air-lock and temperature sensor as well as the wires and tubes running to the lid. In the lid is the motor for stirring the wine, a tube for the pump runout and a tube for the air-lock mounted on the default metal lid covered by a 3D printed plastic cover.
The carboy
We have decided to build the construction of the smartWINERY around a readymade glass carboy, which has caused some limitations. Since we weren’t able to cut in glass, we needed to design our product to only need the two holes already in the carboy (the lid and the sprout).

The filter
When brewing wine you normally need to rack the wine manually. This is due to the fact, that the fermentation produces sediment consisting of old/dead yeast cells, which can result in a bad taste and smell, if they are not removed from the wine. As we wanted the product to be as smart as possible, we decided that the racking needed to take place inside the carboy itself. We talked to a wine expert (Sofie Saerens), who agreed with our idea about a filtration system. The filter we decided on is placed within a drawer, as this needs to be accessible when the user needs to empty it after a racking.
The temperature sensor
One of the most important elements of brewing wine is keeping the yeast active for the ideal amount of time, which is why the temperature needs to be within a certain range to keep the yeast active. Therefore a temperature sensor is placed within the spine, and the measured temperature is shown both on the OLED screen and the app. The app will also notify the user if the temperature is too high or too low, so that the user can correct the placement or temperature of the smartWINERY.
The whisk
To make sure that the yeast is kept active and to help the wine release CO2, you need to stir the wine daily. It is however important not to stir it too fiercely, to avoid the yeast getting stressed. In our product it is also a feature that our whisk is designed so that it can reach the sediment fallen into the carboy groove, since this needs to get into movement before we can filter it and remove it from the wine.

The bubble counter
To keep track of the amount of alcohol produced, we have implemented an IR Optocoupler on the airlock. If you know the amount of bubbles produced since the fermentation began, you can estimate the alcohol percentage by the formula below (the formula is based on bubbles with 1 mL volume, 4.5 L juice in the carboy and fermentation at room temperature and 1 atmosphere). The formula gives the alcohol concentration by weight (g/100mL) which equals alcohol percentage:

The bubble counter is further responsible for signaling when the brewing has stopped. This happens if after the second racking/filtering the counter doesn’t detect an average of one bubble per minute for an hour.

User Interface
The purpose of the UI is to allow the user to track how far they are in the process of brewing their homemade wine, and to inform about the status of the fermentation. We expect the target user to be someone who is attracted to "Do It Yourself" projects, but at the same time doesn't have too much time on their hands to immerse themselves totally in the art of brewing homemade wine. The UI therefore needs to be very user friendly to take the stress off the user, and guide them through the whole process.


Node-RED
To get an overview of how the different main functions communicate with each other, a flowchart resembling our final UI flow has been made. To avoid some problems from earlier iterations we have attempted to put as much as the heavy lifting on the Node-RED backend as possible, since we have experienced challenges with data collecting and logging on our ESP board.
The following flowchart has served as an initial guidance when building our entire UI. In the process of developing our NodeRED code, we refined the functions, and found shortcuts.
Frontend
For the user-friendly UI that we are aiming for, a recipe catalogue has been implemented. We wanted to provide flexibility for the user, so the user can determine if they want to end up with a hard cider, regular apple wine, or a dessert wine. The choice of recipe will reflect throughout the UI, as well as determine the duration of the brew. We implemented a level gauge which tells the user an estimate of how far along the fermentation process is. For this, we have used several different nodes from the UI-dashboard library, which enables us to log the data in graphs so that the user can follow and keep track of the process.

Backend
For the backend part, the only data that NodeRED receives from the ESP is the temperature and number of bubbles passing through the airlock. The data is converted through the following; The data measured from the ESP is collected as integers, which are then converted to strings that can be sent to the cloud MQTT, where it is converted back to integers in NodeRED and then stored in arrays. As we need to store quite a big amount of data (data is collected continuously for up to 8 weeks), we decided to go with this solution. By storing the data online, the data will still be saved if the ESP should restart at some point or lose connectivity.
In addition, by having NodeRED do the data processing, we can set up a monitoring system for when the temperature gets too high or low. This also keeps track of the bubble counting. Notifications are sent out to the user, so if one of the parameters is off, the user would still have the opportunity to save their homebrew. The stirring and racking of the wine will also be controlled through NodeRED, as it will be connected to timers that set these actions off, once the batch has started fermenting. These actions are critical for the quality of the wine, which is why the responsibility is placed on NodeRED rather than arduino and the user. In addition, the timing for these actions have been altered depending on which recipe the user chooses, as different time frames are in play.

Hardware/software limitations
In terms of limitations, it is not possible for us to "connect/enter" the smartWINERY and tell it which network to connect to, because of how the code is set up now. The OLED screen we have presently is also quite small, which means that there isn't really room to display a lot of information. This screen size is not ideal, but for now it will do.
Other limitations are mostly centered around the connection between NodeRED and the smartWINERY, as they need to be connected through the cloud MQTT from the start in order to work together.
Arduino
Code-wise nothing major has happened since the alpha prototype, since we’ve moved as much as possible to Node Red. The interrupt function used to count bubbles caused a lot of issues to begin with, but after many different approaches we got it to work with the ESP8266. For controlling the stirrer motor and pump with relays we added very simple ON/OFF functions which are then controlled by the callback functions by Node Red.

OLED
We’ve furthermore added some animations to the OLED screen which appears whenever a new bubble runs through the airlock, when the smartWINERY is stirring and racking the wine and also a festive animation for when the wine is done brewing.


The animations are simply made by displaying bitmaps of the different frames on the OLED display with short delays between within the loop of the code. Which animation is shown on the screen is determined by different booleans stating the current status of the smartWINERY, e.g. “stir = true” when the stirrer motor is running. Moreover the OLED shows the most important data from the smartWINERY.
Reflection
Looking back on the project, the process has all in all went better than expected. Our main issue has been time, and we could maybe have prioritised some of our tasks better. It has influenced us how we all quickly fell in love with the project, and it can be discussed if we have spent time on some unnecessary elements instead of getting the main functions actually functioning at first - since this caused a tight final sprint. But again - “diamonds are made under pressure”. Further, some documented and more structured user involvement could have been performed. We have talked to both brewing experts and users/friends/family, and have gotten positive feedback almost every time. It would however be a good idea to do some more in depth interviews and test on potential users, to check if our product is intuitive, fits our user's needs and expectations and if the product in general is likable.
Future work
If we were to do a startup on our product, we would try to implement the following:
-
A functioning spout to bottle the wine
-
A larger OLED screen
-
Stirring mechanism from the bottom to avoid a motor inside the lid, which will make it more stable and allow for a smaller LID.
-
Nespresso connections from the base as hose-inlet and -outlet.
-
More user involvement
For more information and details about the smartWINERY, go checkout the BOM and PRD
See you Lhamas alaplaya (◕(‘人‘) ◕)